


Ciobanu Razvan | Duration: 2:45 h | Video: H264 1920x1080 | Audio: AAC 44,1 kHz 2ch | 898 MB | Language: English
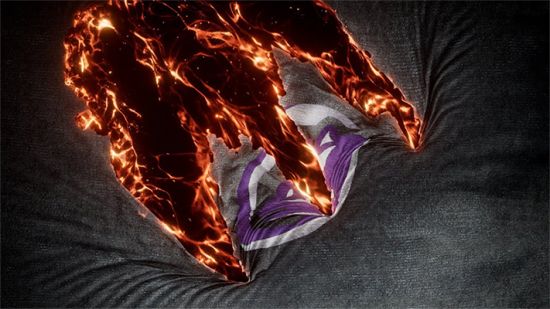
Welcome to a new Houdini tutorial, Burning Cloth Tear
VELLUM & ATTRIBUTE GROWTH
We will start this course by creating a simple cloth setup using Vellum.
We will create and animate the collider geometry to drive the main deformations of our cloth.
Using a custom growth solver we will be able to manually delete constraints from the vellum object, causing the cloth to tear.
To have more flexibility, we will create a separate vellum simulation with wind and noise, which we will combine with our main tearing simulation. So we will be essentially layering two separate vellum simulations on top of eachother.
PARTICLES
After we cleanup the geometry, we move on to particles.
We will base our particle emission source on the cloth that we created.
Here we will talk about how to manually interpolate our particle source to create a smooth result without stepping issues.
We will create a smoke simulation first, and then advect our particles using the velocity field, and we will create 2 different layers of particles.
RENDERING
In the rendering section, everything will be fairly simple and straight forward. We will create a cloth material using megascans texture, and set up a simple shader for our particle layers.
NUKE / COMPOSITING
Inside Nuke we bring everything together. In this section I will show you a very flexible way to add a logo to our cloth, that follows the animation.
We will map the logo using the UV coordinates from our cloth, and also show you how to use the normals AOV in order to re-light our geometry.
We are going to color the particles directly inside of Nuke, using our own custom gradient, to ensure maximum flexiblity.
Homepage
У вас нет разрешения на просмотр ссылки, пожалуйста Вход или Регистрация
У вас нет разрешения на просмотр ссылки, пожалуйста Вход или Регистрация